

Getting Started With CloudTIMS
First, apply for your certificate.
First of all, what IS the TIMS Certificate, and why do you need it?
The certificate is a unique electronic document, issued by the Commissioner, for each taxpayer's system, that ensures their 'digital signature' when connecting to TIMS, and is necessary in order to ensure the security of this connection when fiscalizing every sales transaction and providing the fiscalized receipt.
A certificate should be unique to a organisations's TIN number, and by default is for the 'head office'. Once you have your login to the Taxpayer Admin Portal, you can request additional certificates for other locations.
Please note that you cannot 'approve' an invoice, and get your fiscalized receipt with a QR code in CloudTIMS until you have received your certificate from the Ministry of Customs & Revenue (MCR), and uploaded it into CloudTIMS.
How to get your Certificate
In order to get a a TIMS Certificate, first of all you need to register with the Taxpayer Admin Portal (TAP), first go here: https://support.tims.revenue.gov.ws/pages/taxpayer-admin-portal-tap For information on how to enrol.
You can click on the link at the bottom of the screen to go to here: for the user manual on the Taxpayer Admin Portal.
Once you (or the authorised person) has registered, you can access the Portal and follow the following steps:
Business to login to TAP on https://tap.tims.revenue.gov.ws/ using their admin card and card reader. Google chrome is the preferred browser.
Enter the 4-digit PIN of the admin card.
Once logged in, go to “Business Locations”
Under the list of business locations, click on the arrow ‘>’ beside the HQ or Branch location name, there will be a drop down. Example below:

Click on “Request Additional Certificates”
Scroll down to “Files” and click on the ‘+’ button to generate the PAC & Password of the POS.pfx file. Example below:

Click on submit.
If you try and access the TAP url and receive 403 errors, please clear the browser cache. Preferably ‘All Time History’ and restart the browser then try again.
Next, upload your certificate to CloudTIMS
You (or the authorised person in your organisation) will have registered, as a tax payer, with Ministry of Customers & Revenue (MCR) Taxpayer Admin Portal (TAP) and will have been sent an email with the details required (real data replaced with example data):

You will need to have downloaded the .pfx attachment from this email, so you can use the system dialog to select and upload the file.
Register and/or log in to CloudVMS. Go to the Settings Menu and the Location Settings Sub-Menu.

By default, a ‘Head Office’ Location is created for you. You can either upload your certificate for this location, or add a new location by clicking on the Add Location Button and then the Edit icon


for the location you want to upload a certificate for. This will bring up the following screen:

Enter the UID (found in the email with the certificate)
Enter the PAC (POS Access Code) Code (found in the email with the certificate)
Enter the Password (found in the email with the certificate)
Upload the certificate (the file with a .pfx suffice sent to you by MCR) click on the box saying “Drop MCR Certificate here or click to upload, and this will your systems file management application (e.g. on a mac, this would be a finder window). Navigate to where you have dowloaded your .pfx file, and select it. CloudTIMS will show you the file name and size. Now click on the Save button.
You will see that the Location screen column “Certificate Loaded’ will now say Yes:

You can now Fiscalize your invoices and get a Fiscal Receipt!
Connecting Xero
Click on the Integrations Menu, and select the Xero menu option (more integrations will be available in future versions):

Click on the Xero Connection toggle button.
You will then be asked to log into Xero account:

You will then see messages asking you to allow Cloud-Core (underlying application for CloudTIMS) access to your Xero data. Click on allow access, and connect. e.g.:

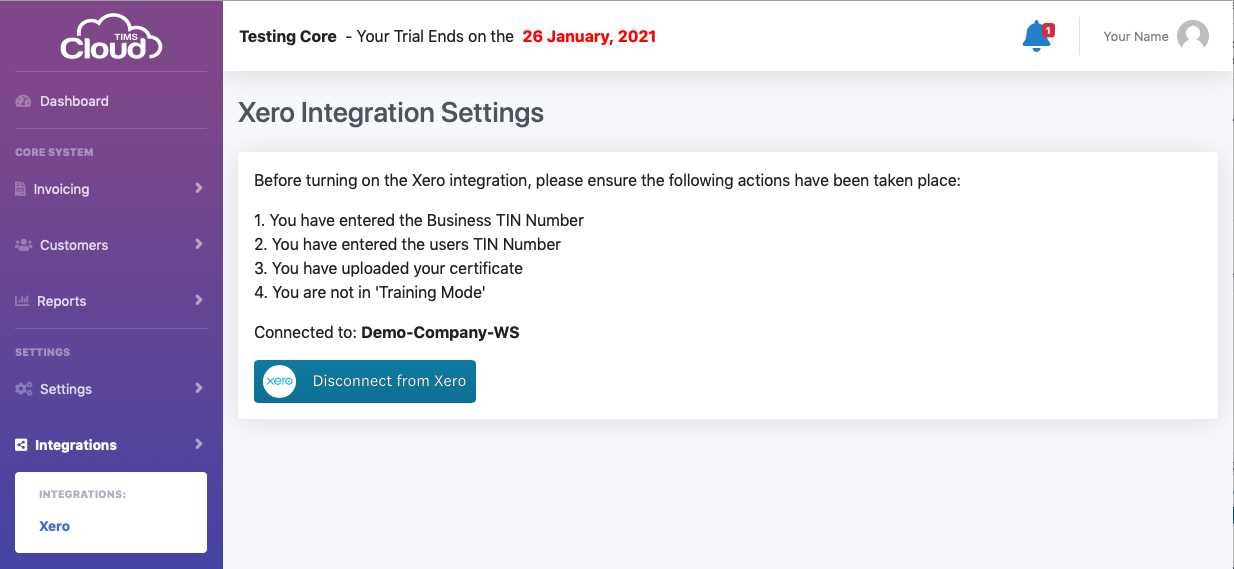
Now, when you look at the Xero Integration screen, it will show which Xero organisation you are connected to, and shows a Disconnect from Xero button. e.g.:
If you were to look at connected apps in Xero (Settings, Connected Apps) you will see that Cloud-Core is connected to your Xero account. e.g.:

Now, every time you approve, or edit and update a Sales Invoice in Xero, this will be copied to CloudTIMS and saved as a draft. CloudTIMS will also get any associated Customer records from Xero for you.
IMPORTANT, make sure that Xero has the Tax ID (TIN) for any of your business to business customers.
Steps to Fiscalize a Xero Sales Invoice using CloudTIMS
Edit the draft invoice (note: invoices that have come from Xero have the Xero logo in the header)

2. Confirm Location (if you have more than one), Payment
Type (if known, otherwise keep default of ‘Other’), and
Tax Codes.
3. Click the Save button to action any changes
4. Click the Fiscalize button to get your Fiscal Receipt, with
QR Code
You can now download the Fiscal Receipt and attach to the Xero invoice for your customers records.
